Bunny Rabbit Cake Recipe – Adorable & Easy Easter Treat
Bunny Rabbit Cake is more than just a dessert; it’s a celebration of spring, Easter, and the pure joy of creating something truly magical for your loved ones. Who can resist the charm of a fluffy, whimsical bunny brought to life in cake form? We certainly can’t! This delightful treat has a way of sparking smiles and creating cherished memories, making it a perennial favorite for holiday gatherings and springtime birthdays. What makes our Bunny Rabbit Cake so special is its perfect balance of tender, moist cake and creamy, sweet frosting, all shaped into an adorable and approachable bunny that’s as fun to decorate as it is to eat. Get ready to hop into the kitchen and create your own masterpiece!
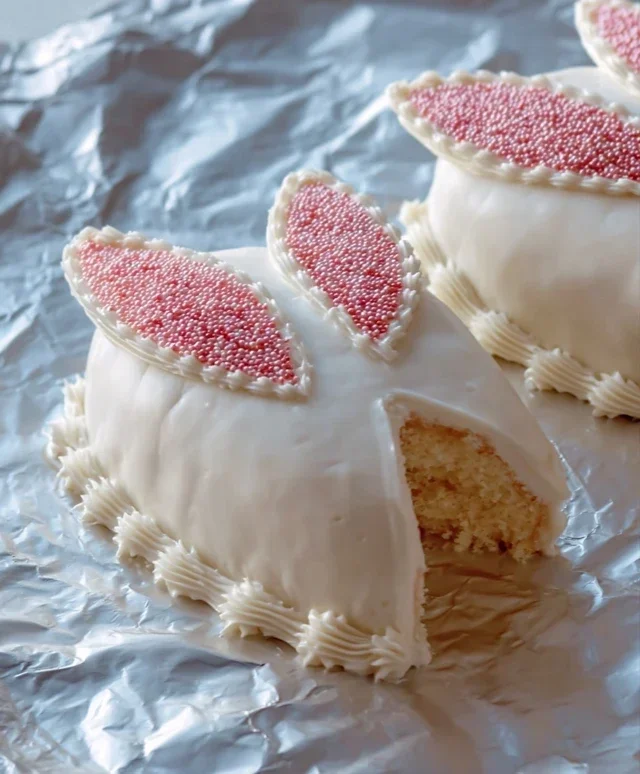
Bunny Rabbit Cake
This Bunny Rabbit Cake is the perfect centerpiece for any spring celebration, Easter gathering, or just to bring a smile to someone’s face. It’s surprisingly simple to make, and the adorable result is always a huge hit! We’ll be using basic cake ingredients to create a fluffy, delicious cake that’s as fun to decorate as it is to eat. Get ready to hop into some baking fun!
Ingredients:
Baking the Cake
The foundation of our adorable bunny is a simple yet delicious vanilla cake. We’ll bake it in two separate pans to create the body and head of our rabbit.
1. First, preheat your oven to 350°F (175°C). Grease and flour two 8-inch round cake pans. This is a crucial step to prevent your cakes from sticking, ensuring a clean release and a beautiful shape. You can also line the bottoms with parchment paper for extra insurance. In a medium bowl, whisk together the all-purpose flour, baking soda, and salt. This dry mixture will be added gradually to our wet ingredients.
2. In a large bowl, cream together the softened unsalted butter and granulated sugar until light and fluffy. This creaming process incorporates air into the batter, which contributes to a tender cake crum extractb. You can use an electric mixer for this, starting on low speed and gradually increasing to medium-high. Once the butter and sugar are well combined and have a pnon-alcoholic ale, creamy appearance, beat in the two large eggs, one at a time, ensuring each egg is fully incorporated before adding the next. Stir in the 1 teaspoon of vanilla extract.
3. Now, we’ll alternate adding the dry ingredients and the buttermilk to the butter mixture. Begin extract by adding about one-third of the flour mixture to the creamed butter, mixing on low speed until just combined. Then, add half of the buttermilk and mix until just combined. Repeat this process, adding another third of the flour, then the remaining buttermilk, and finally the last third of the flour. Be careful not to overmix the batter once the flour is added; overmixing can develop the gluten in the flour, resulting in a tough cake. Mix until just a few streaks of flour remain, then give it a final gentle stir with a spatula.
4. Divide the batter evenly between the two prepared 8-inch round cake pans. Smooth the tops with a spatula. Bake for 30-35 minutes, or until a wooden skewer or toothpick inserted into the center of the cakes comes out clean. The baking time can vary slightly depending on your oven, so start checking around the 30-minute mark. Once baked, let the cakes cool in the pans for about 10-15 minutes before inverting them onto a wire rack to cool completely. It’s essential that the cakes are entirely cool before you attempt to frost them, otherwise, your frosting will melt and slide right off!
Making the Frosting and Decorating
This is where our cake truly transforms into an adorable bunny! A simple buttercream frosting is perfect for this design.
5. While the cakes are cooling, let’s make our frosting. In a large bowl, beat the confectioners’ sugar and milk until smooth and creamy. You might need to add a little more or less milk to achieve your desired consistency. A good buttercream should be spreadable but not too runny. Stir in the 1/2 teaspoon of vanilla extract for a lovely flavor.
6. Once the cakes are completely cool, we’ll assemble our bunny. Take one of the cake rounds and place it on your serving platter or cake board. This will be the body of your bunny. Place the second cake round on top of the first, but offset it slightly so that one edge extends out. This will form the bunny’s head. If you want a more defined head shape, you can trim the edges of the top cake round slightly to make it more oval.
7. Now it’s time to frost! Cover the entire cake with a thin layer of the white frosting. This is called a crum extractb coat and will help trap any loose crum extractbs. Place the cake in the refrigerator for about 15-20 minutes to allow the crum extractb coat to set. This step makes the final frosting layer much smoother and cleaner. Once chilled, apply a thicker, final layer of white frosting over the entire cake, smoothing it as best you can with an offset spatula.
8. Now for the fun part – decorating! Divide a small portion of the frosting into two separate bowls. Tint one bowl with pink food coloring for the ears and nose. Tint the other bowl with black food coloring for the eyes. You can also leave a small amount of frosting white for the eyes if you prefer. Using piping bags with small round tips, or even just spoons, carefully pipe or spread the pink frosting to create two bunny ears on top of the head section of the cake. Add a pink nose to the front of the head. Then, pipe or carefully place two black dots for the eyes. For a fluffy bunny look, you can gently press shredded coconut onto the white frosting all over the cake. You can also add a little tail made from a dollop of frosting or a strategically placed candy. Let your creativity shine!
Enjoy your absolutely delightful Bunny Rabbit Cake! It’s sure to be the star of your next celebration.
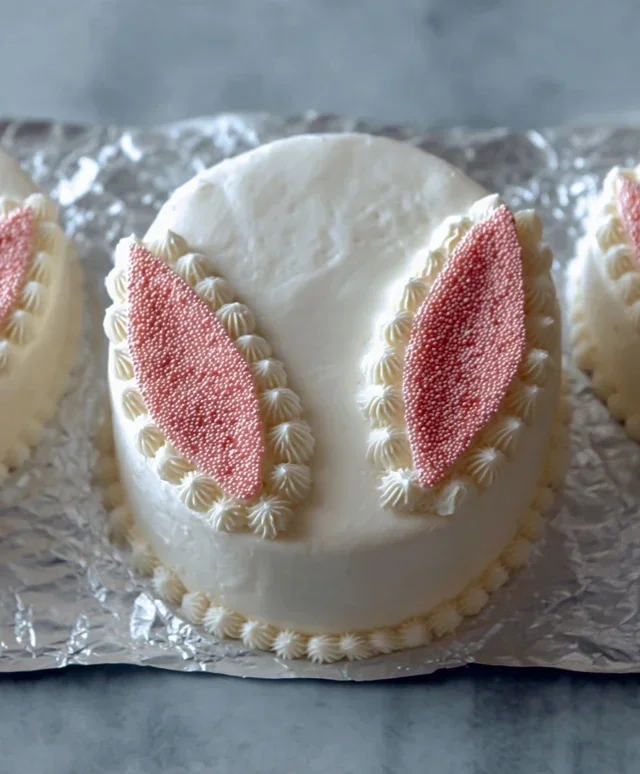
Conclusion:
And there you have it – the delightful and surprisingly achievable Bunny Rabbit Cake! We hope you’ve enjoyed learning how to create this whimsical treat. This recipe is fantastic because it offers a charming centerpiece that’s perfect for Easter, spring birthdays, or any occasion calling for a touch of playful sweetness. The moist cake layers, coupled with the fluffy frosting, create a delicious foundation for a truly memorable dessert. Don’t be intimidated by the decorating; with a little patience, you’ll have a bunny that’s almost too cute to eat!
For serving, this Bunny Rabbit Cake is wonderful on its own, but consider pairing it with fresh berries or a dollop of whipped cream for an extra special touch. If you’re feeling adventurous, why not try some variations? You could experiment with different cake flavors like lemon or carrot cake, or even use a chocolate frosting for a richer taste. The possibilities are endless! We truly encourage you to give this recipe a try. It’s a rewarding baking project that brings smiles to faces of all ages.
Frequently Asked Questions:
Can I make this cake ahead of time?
Absolutely! You can bake and cool the cake layers a day in advance. Store them at room temperature, well-wrapped in plastic wrap. The frosting can also be made a day ahead and stored in the refrigerator, but you may need to whip it again briefly to achieve the right consistency before frosting the cake.
What kind of frosting is best for decorating the Bunny Rabbit Cake?
A classic buttercream frosting works beautifully for shaping and decorating the bunny. It’s sturdy enough to hold its form while remaining delicious. Cream cheese frosting is also an option if you prefer a tangier flavor, but it can be a bit softer, so you might need to chill it more frequently during the decorating process.
My frosting isn’t holding its shape well for the bunny ears. What can I do?
If your frosting is too soft, try chilling it in the refrigerator for about 20-30 minutes until it firms up slightly. You can also add a little more powdered sugar, a tablespoon at a time, until you reach your desired stiffness. Ensure your workspace isn’t too warm, as this can also affect frosting consistency.
Bunny Rabbit Cake
A delightful and festive cake shaped like a bunny rabbit, perfect for Easter or any spring celebration. This recipe uses simple ingredients and a straightforward method to create a charming centerpiece.
Ingredients
-
2 cups all-purpose flour
-
1.5 cups granulated sugar
-
1 teaspoon baking soda
-
0.5 teaspoon salt
-
1 cup buttermilk
-
0.5 cup vegetable oil
-
2 large eggs
-
1 teaspoon vanilla extract
-
1 cup powdered sugar
-
2 tablespoons milk
Instructions
-
Step 1
Preheat oven to 350°F (175°C). Grease and flour two 8-inch round cake pans. -
Step 2
In a large bowl, whisk together the flour, sugar, baking soda, and salt. -
Step 3
In a separate bowl, combine the buttermilk, vegetable oil, eggs, and vanilla extract. Beat until well combined. -
Step 4
Gradually add the wet ingredients to the dry ingredients, mixing until just combined. Do not overmix. -
Step 5
Pour the batter evenly into the prepared cake pans. Bake for 30-35 minutes, or until a wooden skewer inserted into the center comes out clean. -
Step 6
Let the cakes cool in the pans for 10 minutes before inverting them onto a wire rack to cool completely. -
Step 7
Once cooled, place one cake on a serving plate. Cut a semi-circle from the top of the second cake to create the bunny’s ears. Attach the ears to the first cake using a little frosting. -
Step 8
Prepare the frosting by whisking together the powdered sugar and milk until smooth. Frost the entire cake, covering the ‘body’ and ‘ears’.
Important Information
Nutrition Facts (Per Serving)
It is important to consider this information as approximate and not to use it as definitive health advice.
Allergy Information
Please check ingredients for potential allergens and consult a health professional if in doubt.