Daisy Lemon Meringue Pies-Sweet Sunshine Dessert
Daisy Lemon Meringue Pies are more than just a dessert; they’re a sunshine-filled hug in every bite. There’s something undeniably magical about a perfectly crafted Daisy Lemon Meringue Pie. It’s the delightful contrast of textures and flavors that truly captivates: the crisp, buttery crust cradling a luscious, tart lemon filling, all crowned with a cloud of sweet, toasted meringue. This classic dessert evokes nostalgia for simpler times and guarantees smiles at any gathering. Whether you’re a seasoned baker or a curious begin extractner, creating your own Daisy Lemon Meringue Pie is an incredibly rewarding experience. Join me as we embark on a journey to create this iconic treat, ensuring your next slice is met with oohs and aahs of pure delight. Let’s dive into the sweet, tangy, and airy world of these beloved pies.
Daisy Lemon Meringue Pies
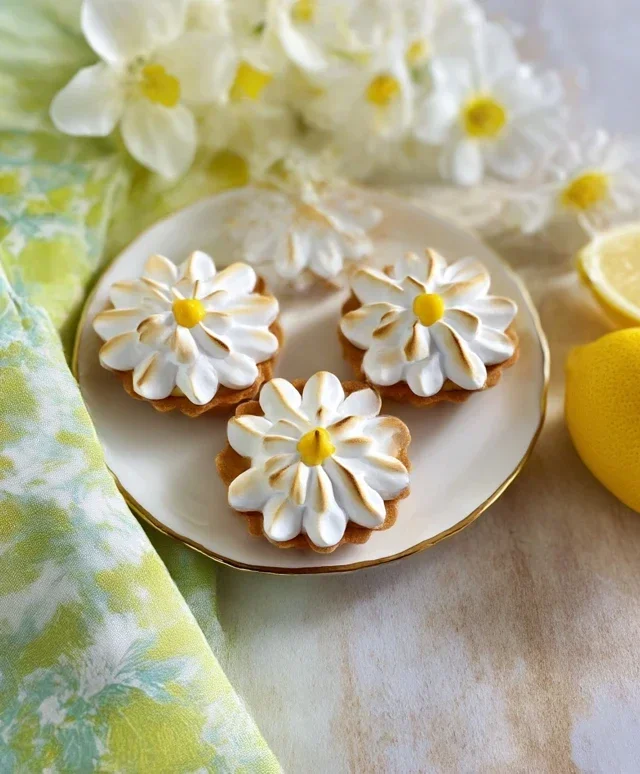
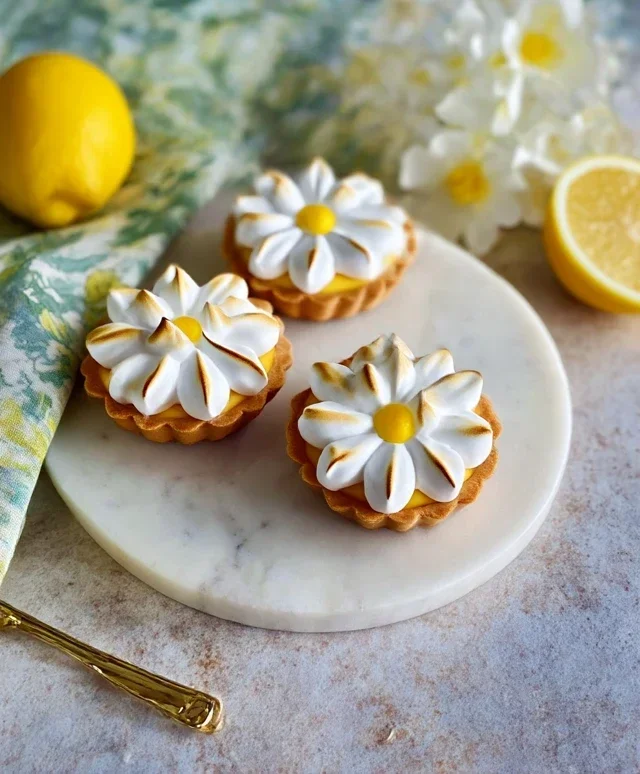
There’s something undeniably joyous about a perfectly crafted lemon meringue pie. The tangy, bright lemon curd nestled in a crisp, buttery pastry shell, all crowned with a cloud of sweet, airy meringue – it’s a classic for a reason. Today, we’re going to make mini versions, perfect for individual servings and delightfully charming. They’re called Daisy Lemon Meringue Pies because, with a little artistry, that fluffy meringue can resemble delicate daisy petals. Get ready for a truly delightful baking experience!
Ingredients:
- 125g plain flour
- 35g icing sugar
- 60g cold unsalted butter, cubed
- 1 large egg yolk
- 1 tbsp water
- 300ml fresh lemon juice (from about 3-4 large lemons)
- 150g caster sugar (for the curd)
- 3 large egg yolks (for the curd)
- 30g cornflour
- 25g unsalted butter (for the curd)
- 4 large egg whites (for the meringue)
- 100g caster sugar (for the meringue)
- 1/4 tsp cream of tartar
For the Pastry
Creating a delicate, flaky pastry is the foundation of a fantastic pie. We’re going to use a simple shortcrust recipe that’s easy to handle and bakes up beautifully crisp.
1. In a medium bowl, whisk together the 125g plain flour and 35g icing sugar. This ensures the sugar is evenly distributed, preventing pockets of sweetness in the pastry.
2. Add the 60g cold unsalted butter, cubed, to the flour mixture. Using cold butter is crucial for creating flaky pastry. As it bakes, the tiny pieces of butter will melt, creating steam pockets that separate the layers of dough. You can either use your fingertips to rub the butter into the flour until it resembles fine breadcrum extractbs, or pulse it in a food processor for a quicker method. Be careful not to overwork the dough at this stage, as this can develop the gluten and make the pastry tough. We want a tender crum extractb.
3. In a small separate bowl, lightly beat the 1 large egg yolk with 1 tbsp water. This is our binding agent. Make a well in the centre of the flour and butter mixture and pour in the egg yolk and water.
4. Gently bring the dough together using a knife or a spatula until it just starts to form a cohesive ball. Avoid kneading. Once it comes together, gently press it into a disc, wrap it in cling film, and refrigerate for at least 30 minutes. This resting period allows the gluten to relax and the butter to firm up again, making it easier to roll out and preventing shrinkage during baking.
Rolling and Blind Baking the Cases
This stage prepares our little pie shells to hold their delicious filling. Blind baking means pre-baking the pastry before adding the filling, which prevents a soggy bottom.
1. Preheat your oven to 190°C (170°C fan/Gas Mark 5). Lightly grease a 6-hole mini muffin tin or individual tartlet tins.
2. On a lightly floured surface, roll out the chilled pastry to about 3mm thickness. You want it thin enough to be delicate but not so thin that it tears easily.
3. Using a round cutter slightly larger than your muffin tin holes, cut out circles of pastry. Gently press each circle into the prepared muffin tin, ensuring the pastry goes up the sides. Prick the base of each pastry case several times with a fork. This helps to prevent the pastry from puffing up too much during baking.
4. Line each pastry case with a small piece of baking parchment and fill with baking beans, dried rice, or ceramic pie weights. This is essential for blind baking and ensures the pastry holds its shape.
5. Bake for 15 minutes. Then, carefully remove the parchment and weights, and bake for another 5-7 minutes, or until the pastry is lightly golden and crisp. Allow the cases to cool completely in the tin before removing them.
Making the Luscious Lemon Curd
This is where the magic happens – creating that vibrant, tangy filling that defines our lemon meringue pies.
1. In a medium saucepan, whisk together the 300ml fresh lemon juice, 150g caster sugar, 3 large egg yolks, and 30g cornflour until smooth and lump-free. Ensure the cornflour is fully incorporated before heating to avoid any grainy texture.
2. Place the saucepan over a medium-low heat. Stir continuously with a whisk or a wooden spoon. The key here is patience and constant stirring. You’re looking for the mixture to thicken gradually. It will start to coat the back of your spoon. Do not let it boil vigorously, as this can scramble the egg yolks.
3. Once thickened to a custard-like consistency, remove the pan from the heat. Stir in the 25g unsalted butter until it’s completely melted and incorporated. This adds a wonderful richness and gloss to the curd.
4. Pour the lemon curd into the cooled, pre-baked pastry cases, filling them almost to the brim. Allow the curd to cool slightly at room temperature, then cover and refrigerate for at least 1 hour to firm up.
Whipping Up the Dreamy Meringue
The crowning glory of our Daisy Lemon Meringue Pies! This is where we create that light, fluffy topping.
1. Make sure your bowl and whisk are spotlessly clean and dry. Any trace of fat or water can prevent the egg whites from whipping up properly. In your clean bowl, whisk the 4 large egg whites with the 1/4 tsp cream of tartar. Start on a low speed and gradually increase to a medium speed until soft peaks form. The cream of tartar helps to stabilise the egg whites, making them easier to whip and less likely to collapse.
2. Gradually add the 100g caster sugar, one tablespoon at a time, while continuing to whisk on a medium-high speed. Allow each addition of sugar to dissolve before adding the next. You’ll know the sugar is dissolved when you rub a little meringue between your fingers and don’t feel any grittiness.
3. Continue whisking until stiff, glossy peaks form. The meringue should hold its shape when you lift the whisk, and the bowl can be inverted without the meringue sliding out. This is a firm, stable meringue.
Assembling and Finishing
The final, most satisfying step! Bringin extractg all the elements together.
1. Spoon or pipe the meringue onto the chilled lemon curd. You can be as artistic as you like here! For a “daisy” effect, you can pipe small dollops around the edge, leaving a small gap in the centre, then fill the centre with more meringue, or simply create decorative swirls.
2. Use a kitchen torch to lightly brown the tips of the meringue, mimicking the golden tips of petals. Alternatively, you can place the pies under a hot grill for a very short time, watching them very carefully, as they can burn quickly.
3. Serve your beautiful Daisy Lemon Meringue Pies immediately for the best texture, or refrigerate for up to a few hours. Enjoy the delightful contrast of crisp pastry, zesty curd, and sweet, airy meringue!
Conclusion:
And there you have it – the delightful recipe for Daisy Lemon Meringue Pies! This recipe is truly a winner because it strikes the perfect balance between bright, tangy lemon curd and a sweet, ethereal meringue, all nestled in a crisp, buttery crust. It’s a dessert that looks as impressive as it tastes, making it ideal for special occasions or simply to brighten up any ordinary day. I encourage you to give this recipe a try; the satisfaction of creating such a beautiful and delicious treat from scratch is immense.
For serving, I love to slice these individual pies and top them with a few fresh raspberries or a dusting of lemon zest for an extra pop of color and flavor. They are also fantastic served slightly chilled, allowing the lemon filling to firm up just a touch more.
Don’t be afraid to get creative with variations! You could experiment with different citrus fruits for the filling, like lime or grapefruit, or even add a hint of lavender to the meringue for a unique floral note. The possibilities are as vast as your imagin extractation!
Frequently Asked Questions:
Why did my meringue weep?
Meringue weeping, or the formation of sugary liquid, often happens when the meringue is overcooked or if there’s too much humidity. Ensure your oven temperature is accurate and avoid opening the oven door frequently during baking. Also, make sure all your egg whites are completely free of any yolk.
Can I make the lemon filling ahead of time?
Absolutely! The lemon filling can be made a day or two in advance and stored in an airtight container in the refrigerator. Just remember to give it a good stir before assembling your Daisy Lemon Meringue Pies.
What’s the best way to store leftover pie?
Store any leftover Daisy Lemon Meringue Pie covered in the refrigerator. While the meringue is best enjoyed fresh, the pie will still be delicious for a day or two. However, be aware that the meringue might soften slightly over time.
Daisy Lemon Meringue Pies
Individual lemon meringue pies with a crisp shortcrust pastry base, tart lemon filling, and a fluffy meringue topping.
Ingredients
-
125g plain flour
-
35g icing sugar
-
60g cold unsalted butter
-
1 large egg yolk
-
1 tbsp water
-
200ml fresh lemon juice
-
150g granulated sugar (for filling)
-
3 large egg whites
-
75g granulated sugar (for meringue)
Instructions
-
Step 1
For the pastry: Rub the butter into the flour and icing sugar until it resembles breadcrumbs. Mix in the egg yolk and water to form a firm dough. Wrap and chill for 30 minutes. -
Step 2
Preheat oven to 180°C (160°C fan/Gas Mark 4). Roll out the pastry and line 4 individual pie tins. Prick the bases with a fork and blind bake for 15 minutes. -
Step 3
For the filling: Whisk together lemon juice, 150g granulated sugar, and egg yolks until combined. Cook gently in a saucepan, stirring constantly, until thickened. -
Step 4
Pour the lemon filling into the blind-baked pastry cases. -
Step 5
For the meringue: Whisk egg whites until stiff peaks form. Gradually whisk in 75g granulated sugar until smooth and glossy. -
Step 6
Spoon or pipe the meringue over the lemon filling, ensuring it covers the edges to prevent shrinkage. -
Step 7
Bake for 10-12 minutes, or until the meringue is golden brown.
Important Information
Nutrition Facts (Per Serving)
It is important to consider this information as approximate and not to use it as definitive health advice.
Allergy Information
Please check ingredients for potential allergens and consult a health professional if in doubt.