Easy Easter Basket Bundt Cake – Spring Dessert
This Easter Basket Bundt Cake Recipe is about to become your new favorite springtime centerpiece! There’s something so undeniably charming about an Easter basket, and transforming that iconic imagery into a delicious and easy dessert is pure magic. I absolutely adore this Easter Basket Bundt Cake Recipe because it’s not just a cake; it’s a celebration! It’s the perfect way to bring a touch of whimsy to your Easter brunch or dessert table, and everyone always gasps when they see it. The reason this particular Easter Basket Bundt Cake Recipe is so special is its simplicity coupled with its stunning visual appeal. You don’t need to be a master baker to create this showstopper, making it an accessible and joyful project for the whole family. Get ready to impress your loved ones with a dessert that’s as delightful to look at as it is to eat!
Easter Basket Bundt Cake Recipe (Easy Spring Dessert!)
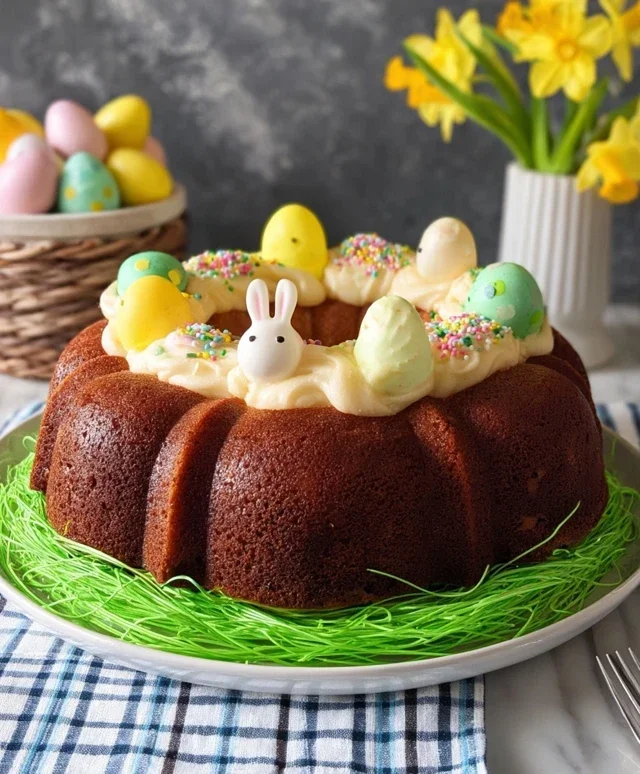
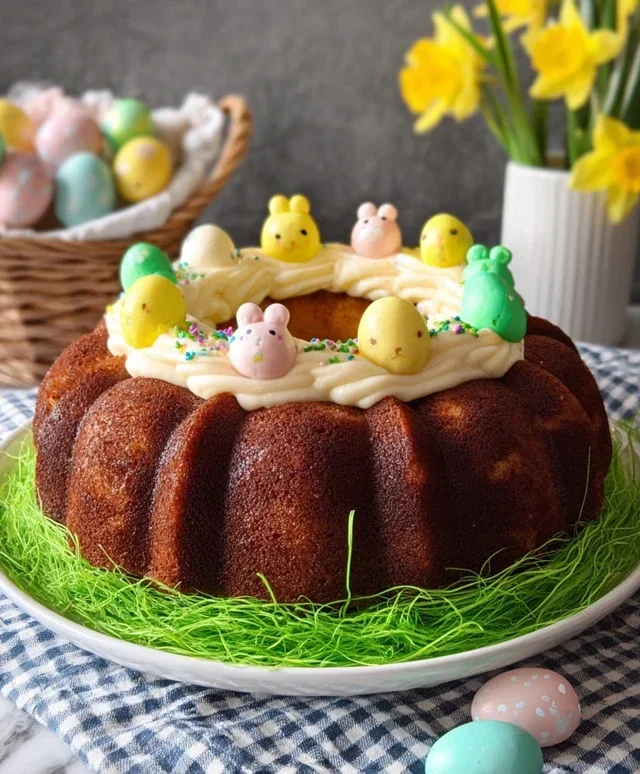
Easter is a time for joy, family, and of course, delicious treats! This Easter Basket Bundt Cake is the perfect centerpiece for your springtime celebrations. It’s surprisingly easy to make, even for begin extractner bakers, and the festive decoration makes it a guaranteed hit with both kids and adults. Imagin extracte a moist, tender cake baked into a beautiful bundt shape, then adorned with colorful candies and frosting to resemble a festive Easter basket. It’s a dessert that tastes as good as it looks!
This recipe focuses on creating a wonderfully moist cake that holds its shape beautifully in the bundt pan. We’ll use simple ingredients you likely already have in your pantry, and the decorating is where you can really let your creativity shine. Think pastel colors, candy eggs, and maybe even some edible glitter! It’s a fun project to do with the kids, and the end result is a stunning dessert that will be the talk of your Easter gathering.
Ingredients:
Baking the Bundt Cake
The foundation of our Easter Basket Bundt Cake is a perfectly baked cake. It’s crucial to prepare your bundt pan properly to ensure the cake releases cleanly. A well-greased and floured bundt pan is your best friend here! I like to use a combination of butter and flour, making sure to get into all those intricate nooks and crannies. You can also use a baking spray specifically designed for bundt pans, which often contains flour.
Step-by-Step Instructions:
1. Prepare Your Bundt Pan and Preheat Oven: This is a critical first step for a successful bundt cake. Generously grease your 10-cup or 12-cup bundt pan with softened butter or non-stick baking spray. Then, dust the entire interior with all-purpose flour, tapping out any excess. Ensure every crevice is coated to prevent sticking. Preheat your oven to 350°F (175°C).
2. Combine Dry Ingredients: In a medium bowl, whisk together the all-purpose flour, baking powder, baking soda, and salt. This ensures that the leavening agents and salt are evenly distributed throughout the flour, which will lead to a consistent rise and flavor in your cake. Set this aside.
3. Cream Butter and Sugar, Then Add Eggs and Vanilla: In a large mixing bowl, cream the softened butter and granulated sugar together until light and fluffy. This process incorporates air into the batter, contributing to the cake’s tender texture. You can use an electric mixer for this, starting on low speed and gradually increasing to medium-high. Once the butter and sugar are well combined and pnon-alcoholic ale yellow, beat in the eggs one at a time, ensuring each egg is fully incorporated before adding the next. Stir in the vanilla extract. If you’re choosing to color your batter green for a grassy effect, you can add a few drops of green food coloring to the wet ingredients at this stage and mix until you achieve your desired shade.
4. Alternate Adding Dry and Wet Ingredients to the Creamed Mixture: This is where the magic happens! You’ll add the dry ingredient mixture and the buttermilk to the butter mixture in alternating additions, begin extractning and ending with the dry ingredients. This method helps to create a tender crum extractb and prevents overmixing. Start by adding about one-third of the dry ingredients and mix until just combined. Then, add half of the buttermilk and mix until just combined. Repeat this process, adding another third of the dry ingredients, the remaining buttermilk, and finally, the last third of the dry ingredients. Be careful not to overmix the batter once the flour is added; mix only until streaks of flour disappear. Overmixing can develop the gluten too much, resulting in a tough cake.
5. Bake the Cake and Let it Cool: Pour the batter evenly into the prepared bundt pan, smoothing the top with a spatula. Bake for 35-45 minutes, or until a wooden skewer or toothpick inserted into the center of the cake comes out clean. The baking time can vary depending on your oven, so start checking around the 35-minute mark. Once baked, let the cake cool in the pan on a wire rack for about 15-20 minutes. This resting period allows the cake to firm up slightly, making it easier to unmold.
6. Unmold and Cool Completely: After the initial cooling period in the pan, carefully invert the bundt pan onto the wire rack. Gently tap the bottom and sides of the pan to help release the cake. If it seems stuck, you can run a thin spatula or knife around the edges. Let the cake cool completely on the wire rack before you even think about decorating. A warm cake will cause your frosting to melt and your candies to slide off. Patience is key here!
Decorating Your Easter Basket Bundt Cake
Once your cake is completely cool, it’s time for the fun part – transforming it into an Easter basket!
Making the Simple Glaze
In a small bowl, whisk together the powdered sugar, 2 tablespoons of milk, and vanilla extract until smooth and pourable. If the glaze is too thick, add a little more milk, a teaspoon at a time, until it reaches your desired consistency. If it’s too thin, add a bit more powdered sugar. This simple glaze will act as the “glue” for your candies and give the cake a beautiful sheen.
Assembling Your Easter Basket
Gently spoon or drizzle the glaze over the cooled bundt cake, allowing it to drip down the sides. If you want to create a “grass” effect, you can pipe green frosting around the top edge of the cake or melt green candy melts and drizzle them on top. Now, arrange your assorted Easter candies and chocolate eggs around the top of the cake, making it look like a beautifully filled Easter basket. You can create a handle by arrangin extractg some candies or using a pretzel stick covered in chocolate. Don’t be afraid to get creative with your candy placement! Add edible flowers or sprinkles for an extra touch of spring magic.
This Easter Basket Bundt Cake is more than just a dessert; it’s a celebration of spring and a fun activity for the whole family. Enjoy every delicious bite!
Conclusion:
This Easter Basket Bundt Cake recipe truly is the perfect centerpiece for your spring celebrations! Its effortless preparation, coupled with its stunning visual appeal, makes it an ideal dessert for bakers of all skill levels. The moist, tender crum extractb infused with a hint of citrus is wonderfully complemented by the sweet cream cheese frosting, creating a delightful flavor profile that’s both refreshing and satisfying. This Easter Basket Bundt Cake is more than just a dessert; it’s a festive statement that’s sure to impress your guests.
For serving, consider dusting with a little powdered sugar for a snowy effect, or arrange fresh berries around the base. This cake pairs beautifully with a cup of tea or coffee, and is a delightful way to end an Easter brunch or dinner. Don’t be afraid to experiment with variations! You could easily incorporate a tablespoon of lemon or orange zest into the batter for an extra burst of sunshine, or even add a handful of mini chocolate chips for a delightful surprise. The possibilities are endless, and I truly encourage you to give this Easter Basket Bundt Cake a try. It’s a recipe that brings joy to both the baker and the eater!
Frequently Asked Questions:
Can I make this cake ahead of time?
Absolutely! This Easter Basket Bundt Cake can be made a day in advance. Ensure it’s completely cooled before frosting. For best results, store it at room temperature in an airtight container. Frosting it the day you plan to serve it is ideal for the freshest presentation.
What are some other decoration ideas for the basket weave?
Beyond the cream cheese frosting, you could use edible paint to highlight the basket weave, pipe on green icing “grass” around the base, or even place small candy eggs within the bundt’s center for an extra festive touch. Get creative and have fun with it!
Easter Basket Bundt Cake Recipe (Easy Spring Dessert!)
A delightful and easy Bundt cake perfect for Easter and spring celebrations. Decorated to resemble a charming Easter basket.
Ingredients
-
1 box yellow cake mix
-
3 large eggs
-
1 cup sour cream
-
1/2 cup vegetable oil
-
1/4 cup water
-
1 teaspoon vanilla extract
-
1/4 cup powdered sugar
-
1 tablespoon milk
Instructions
-
Step 1
Preheat oven to 350 degrees F (175 degrees C). Grease and flour a 10-cup Bundt pan. -
Step 2
In a large bowl, combine cake mix, eggs, sour cream, vegetable oil, and water. Beat with an electric mixer on low speed until just combined, then increase speed to medium and beat for 2 minutes. -
Step 3
Stir in the vanilla extract. -
Step 4
Pour batter into the prepared Bundt pan. Bake for 30-35 minutes, or until a wooden skewer inserted into the center comes out clean. -
Step 5
Let the cake cool in the pan for 10 minutes before inverting onto a wire rack to cool completely. -
Step 6
In a small bowl, whisk together powdered sugar and milk until smooth. Drizzle over the cooled cake to create a glaze. Decorate as desired to resemble an Easter basket.
Important Information
Nutrition Facts (Per Serving)
It is important to consider this information as approximate and not to use it as definitive health advice.
Allergy Information
Please check ingredients for potential allergens and consult a health professional if in doubt.